|
|
Starting the design process by choosing the yellow print fabric with dogs and cats, I then pulled about 30 different fabrics from my stash to go with the yellow print, and narrowed the fabric selection to a dark teal and black print, a dark periwinkle print with shapes in bright colors, the red and black polkadot, a lime green solid, a medium teal small scale dot print, and a blue "hand-dyed" print. My second decision was to make the vest fully reversible with embellishments on both sides.
To simplify the vest (and ensure that I would finish it in time), I
decided to make one front on each side out of a single piece of fabric,
to piece
the backs with simple patterns, and to do the more flashy embellishement
work on the other fronts.
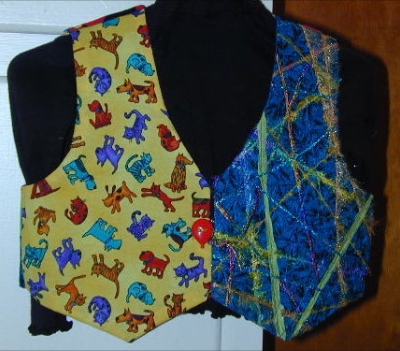
To keep the fronts balanced, I used the two multicolor, medium-scale
prints for the plain sides.
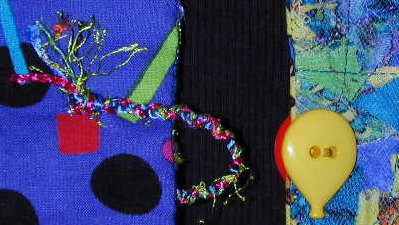
I tried crinkling fabric with couched threads for front 1. Both Judy Murrah and Linda McGhee have methods for this process in their books Jazz It Up and Creating Texture with Textiles. Because I wanted the couched threads to show up, I chose to use the dark teal mono-color print for the background and bright yarns for the "threads". Even though I used the dryer for the initial drying, it took 4 days for my ball of fabric (1/4 yard) to dry completely when wadded up. I checked the after 3 days, but it was still damp on the inside. I rewadded it, and let it sit for another day with no ill effects. I followed Linda McGhee's recommendation to use fusible tricot interfacing to "set" the wrinkles. The fusible tricot was enough of a stabilizer for the couching, too.
Couching threads is really neat. I've long been a fan of the Wendy Hill method of using just thread to embellish something, but since I didn't have a "couching" foot for my machine, I've haven't tried this other method. Well, you don't need a special foot. I decided to use my buttonhole foot because it has 2 grooves in the bottom, and I figured that would help to hold the thread in place. I have no idea if it did or not. Mostly, I used the little hook that is on the front of the foot to keep the thread/yarn centered, and if I went slowly, I didn't have any problems.
I used a varigated thread by Superior Threads and a regular zigzag stitch to hold the yarns down.
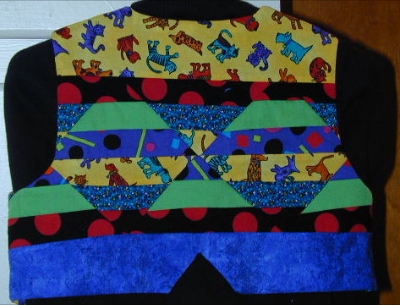
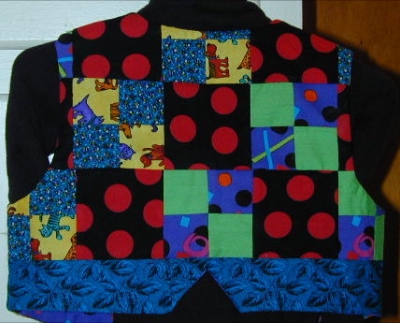
While I was waiting for the crinkled fabric to dry, I worked on the backs of the vest. For back 1, I used a simple four patch pattern. I actually made back 2 first and ran out of one fabric for back 1, so I used a strip of the dark teal on the bottom of the vest. Four patch is a very common piecing pattern, but I did get the idea from Jazz It Up.
For back 2, I chose "pieced squares" from Jazz
It Up. I miscut the lime green strip, and if I'd had more time, I
would have recut that strip or the other strips narrower, but I decided
that it was better to finish
the vest on-time with a bit of mismatched piecing.
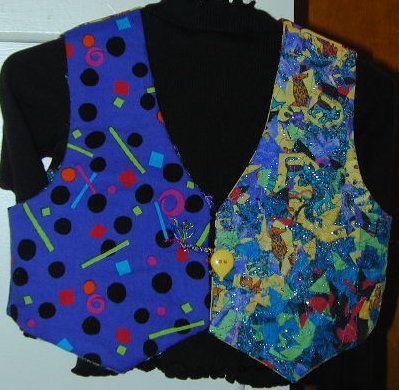
Because I was using the bits and pieces of fabric, yarn, and thread left
over from the other fronts and backs, I created embellished front 2
last. I used "quilting crumbs" from Jazz
It Up. To add some sparkle, I put a bit of tinzel on top of the
"crumbs". It doesn't show in the image. I used a powder fusing agent
between the crumbs and the base fabric, covered the crumbs with light
pink tulle, and used the varigated thread in the Wendy Hill method
to hold the layers together. To add more sparkle, I put Sulky Sliver
turquoise metallic thread in the bobbin and sewed some more lines across
the top of the crumbs. I don't recommend Sulky Sliver, not even in the
bobbin; it breaks very easily.
Once the fronts and backs were done, I put the vest together using Sandra Betzina's Gold Medal Vest Lining. This method will give you a perfectly reversible vest. You can't tell which side was the lining and which is not.
The final step was to figure out some sort of closure. I don't like making buttonholes. I'm not very good at it, and my buttonholes don't turn out very well. Sure, I'd get better with practice, but since this is an embellished vest, why use a plain buttonhole when you could use something else. Lois Ericson has inspired me to use other methods for closures. I decided to braid 4 strands of yarn together to create a cord and sewed that on by hand, instead of a buttonhole. While I think making my own braid was my own idea, I believe that I'd seen the design for this closure in one of LE's books.
|
|
Jennifer |
|
Fight for your right to web standards! | ||
![]()
Fight for your right to web standards!
|
|
Background from My Kids Mom